The world of quilting has so many different skill sets that there really isn’t just one piece that represents all the elements of “quilting.” Aside from the beauty of a full size quilt, the intricate work in each of the small areas called “squares” is really impressive and gives quilters an opportunity to display their work on a smaller scale. While there isn’t standard size for squares, generally they are less than 16 inches square.
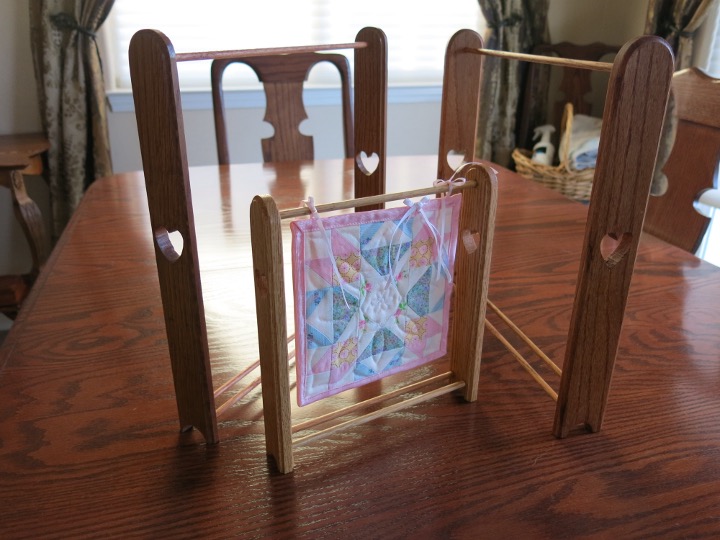
There are many ways to display the squares including picture frames and pin boards, one of the more creative is the square stand. This project came to me from one of the members of Princess Lori’s quilting mafia. She wanted a stand to display a seasonal holiday square that matched the design she had purchased some time ago. Using that as a template, it was time to make some sawdust.
Although the first one i made was specifically sized to match the original, the scale and style for both the end pieces and the cross members can be made in any size with (or without) embellishments. For these first few, the uprights are 1-1/2″ wide and tall enough to fit the maker’s square. i took the size of the square and added an extra inch for both height and width for the square to hang without being crowded. The thickness of the uprights should be proportional to the overall size but for these, 1/2″ stock worked well.
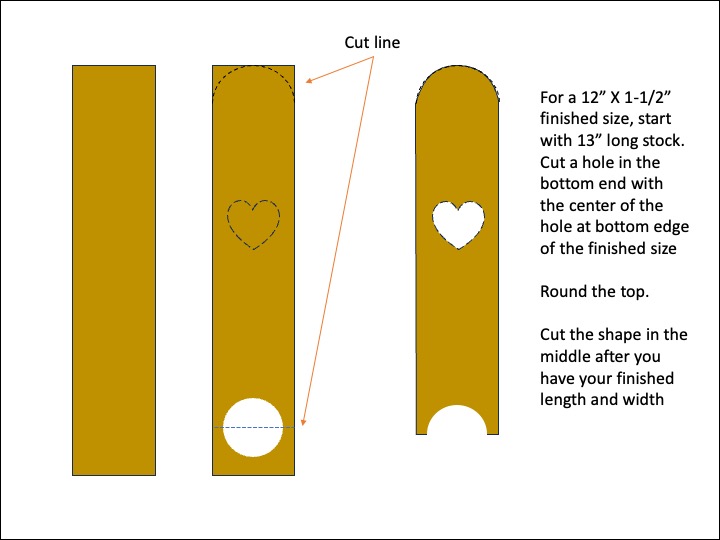
For end pieces, start with extra length to allow for cutting hole in half to make arches.
To make construction a bit easier, I added an additional measure of stock to the finished length dimension to allow me to use a Forstner bit to cut the arch on the bottom. So, for a 12″ finished size, I started with 13″ stock, cut a 1″ hole measured 1/2″ up from the bottom edge. Make sure to use painters tape on the backside of the stock to reduce tear-out. After cutting the bottom hole, a pass on the table saw to cut the hole in half gives a perfect arch with clean cut edges. I used a stop block on the saw miter gauge to ensure both pieces were of exact equal length.
I then used double sided tape to hold both end pieces together and a vertical sander to round the arcs on the tops so they both match. After separating the now rough sized pieces, I traced in the hearts. I tried two different techniques to cut the hearts: drill two holes corresponding to the top arches of the heart and then connect them using a chisel; drill a pilot hole and cut the heart freehand on a router with a 1/8″ straight bit or a up cut spiral bit. The spiral is a little slower but offers more control. The drill method gives better results for the top of the heart but the router method is both easier and faster. Just use a chisel to cut the bottom of the heart. The second method requires a steady hand and will probably need some filing and sanding to smooth out the edges. The second method can also be used to cut other shapes if you don’t want to make a heart.
After cutting the hearts, I used an ogee bit to shape both sides of the end pieces. If you have nice stock wood, this adds some detail to the piece. If you’re using something like poplar or pine, I don’t recommend you route the edges as this will increase the end-grain exposure and potential for blotchy edges when you add the finish.
When all the cutting and shaping is complete, mark and drill your holes for the dowel rods. I used 3/4″ from the top and bottom for my sizing, drilling the holes half the thickness of my stock. The dowels are then 1/2″ oversize length for the finished width of the piece; to get a 12″ wide inside dimension, cut the dowels to 12-1/2″.
I sanded everything, including the dowels, to 220 and then applied stain if desired. Finish out all the pieces before assembly to ensure everything is even. If you assemble first, you’ll probably get finish buildup where the dowels connect. Use a finish that doesn’t bleed. I don’t recommend wax or long drying oil as it may transfer to the display piece. I used an oil varnish or a poly-split to seal the wood. Shellac would be good also.
Once everything is finished, clean out the holes in the end-pieces and rough up the ends of the dowels to promote glue adhesion. I used 5 min epoxy on these as it usually cuts through finish residue and creates a strong bond.
I’ll be adding more pictures as I make different designs and stock. No pictures of the a set made from cherry that was finished with tung oil. Really nice wood but since no pictures, it didn’t happen.